Leaderboard
Popular Content
Showing content with the highest reputation on 05/28/2013 in Posts
-

Blocks 2.1.0
lol username and 2 others reacted to Cyrem for a topic
I personally prefer different tools for different games, they can be better developed to fit their purpose.3 points -

Tutorial: (semi-)Transparency in textures
Sluicer and one other reacted to RobExplorien for a topic
Alpha compositioning in LEGO Racers textures You probably already know how to work with the .BMP files, how to edit them and implement them in the game. If you don't know this, I advise you to check out >this tutorial. What hasn't been explained yet (in a more thorough way), is the use of alpha channels (also known as transparency) in these .BMP formats LEGO Racers uses. Alright, to start off with, you cannot set a colour transparent/opaque in the .BMP files via the editing program you use. A pixel is either filled or clear in LEGO Racers. The alpha channel a .BMP file uses is defined in the files using the .TDB extension in the .JAM archive. Below follow some examples of the structure of a section of a .TDB file: Example taken from MENUDATAPARTDBBODYPART.TDB k_27 // Textures [104] { k_27 // Texture "il_dflt" { k_2A // Bitmap (remove this to denote a TGA texture) k_28 } k_27 // Texture "kk_chst" { k_2A // Bitmap (remove this to denote a TGA texture) k_28 } ... // Other 102 entries cut } This binary file structure is pretty common in the .JAM archive, when viewed with origamiguy's >Binary File Editor. It starts with k_27, which probably functions as to define what we're talking about in the file (which are textures). Under k_27 is a number, placed in square brackets. It defines the amount of entries that will follow between the (mandatory) curly brackets. In our example, we have the IL_DFLT.BMP and KK_CHST.BMP texture files. You already know what these abbreviations mean if you read the skin texturing tutorial. The texture specifications are placed between curly brackets again, to indicate where these specifications refer to (in our case, IL_DFLT.BMP or KK_CHST.BMP). We won't go too much into the k_2A and k_28 now. Just a brief explanation of k_2A: "Denotes the use of a bitmap image, and can be replaced by a TGA (which is a(nother) raster graphics file format).". So this structure is relatively simple to understand. I cannot spot any specified use of alpha channels here, can you? Indeed you can't, because we need a special statement to denote the use of a transparent colour in the designated .BMP file. Take a look at the next example. Example taken from GAMEDATARACEC0R0IGD_MAP.TDB k_27 // Textures [1] { k_27 // Texture "igd_map" { k_2A // Bitmap (remove this to denote a TGA texture) k_28 k_2C // Transparent Color // CONFIRM THIS ONE 0 0 0 } } This .TDB file is much smaller than the former one we've discussed, but that isn't of any issue here. Aside from the specifications 'pointing' to another .BMP file (which is IGD_MAP.BMP in this case), there is an extra statement for this texture. Ofcourse I'm talking about k_2C, and the comments in the code already hint this. The k_2C statement is not hard to understand either. In the .TDB file it is referred as 'transparent color'. Below k_2C are three integers, and you always have to define these integers, when using the k_2C statement (hence the //CONFIRM THIS ONE comment). These three integers stand for an RGB colour code, where the first is for R, the second for G and the third for B. That's right, you can set a specific colour for a .BMP file to be used as transparent. A quick sidenote, the integers defined below k_2C cannot be lower than 0 or higher than 255, because RGB colour codes do not extend beyond these values. In our example, we have IGD_MAP.BMP, which is the texture for the track map displayed in the lower right corner of the race screen. As you can see, the transparent colour for this texture is pure black. Therefore, all colours in the .BMP with pixels of this RGB value are, to simply put it, invisible for the user. Compare the two images below and you see that the blackness in the .BMP is not shown in the actual game. --> in-game --> So, in order to use transparency for a texture, use the k_2C statement. To summarize it shortly: 1. Open the .TDB file and search for the texture (name) you desire to set (partially) transparent. 2. Use/Add the k_2C statement to define the RGB colour code (thus defining which colour will be used as transparent in the designated .BMP file), and save it again. 3. Open the .BMP you wish to texture (partially) transparent with an editor. 4. Select the RGB colour code you defined as to be used as transparent for this specific texture, and edit the texture with this colour to your likings. 5. Save the .BMP (in the right folder) using indexed color (to have the game 'notice' any possible transparency) and recompile and stuff (you know the drill). Now we also have a method for applying semi-transparency to textures, which Brickulator discovered. For applying this we have to include another file, the .MDB file. So, what does the 'inside' of this file look like? Here we have the code for Veronica Voltage her chestpiece. k_27 // Materials [128] { k_27 // Material "vv_chst" { k_29 // Diffuse Color 100 100 100 255 k_28 // Ambient Color 100 100 100 255 k_2C // Texture Name "vv_chst" k_2D k_2B } ... // other 127 entries cut I can see similarities with the .TDB; both start with the k_27 statement, define the amount of entries to follow and denote the texture. So, where and how to apply semi-transparency? For that, we make use of the k_46 statement. Below this statement, we have to set a value ranging from 0 to 255. This value defines the opacity of the texture. The 255 value would be a solid-looking texture, and 0 would be a full transparent texture. Any value inbetween will result into a semi-transparent texture. Note that it is not clear whether it is possible to add 'regional' semi-transparency, e.g. only setting those with RGB values 240;220;0 semi-transparent. So, in order to use this, write the statement below like this: k_27 // Materials [128] { k_27 // Material "vv_chst" { k_29 // Diffuse Color 100 100 100 255 k_28 // Ambient Color 100 100 100 255 k_2C // Texture Name "vv_chst" k_2D k_2B k_46 // Alpa (0-255) 127 } ... // other 127 entries cut Ofcourse you can use another value than 127, but this serves as an example. For her chestpiece, it results into the following output: So, use the k_46 statement to apply the use of semi-transparency to a .BMP in-game. To summarize it shortly: 1. Open the .MDB file and search for the texture (name) you desire to set semi-transparent. 2. Use/Add the k_46 statement to define the opacity of the texture, and save it again in the correct folder. 3. Recompile the .JAM and stuff (you know the drill). If you still have questions, or if you spot a mistake I might have made in this tutorial, I'm open for it.2 points -

Sort of Rock Raiders Remake
Car CrazeXVI and one other reacted to Bartemis for a topic
http://fistiks.nl/uncategorized/update-action I'm proud to present you this update [Download] (2.45 MB) Controls Actions - Left mouse Debugging controls Place light at mouse - Right mouse Go to base - Spacebar Features Better priorities (searches for actions nearby) Digging Resources (At the moment 3 types) Place lights Bugfixes Next update will include: Inventory (Shovel,Drill,Flashlight,Weapon) Buildings Controllable player Cheers2 points -
8th Console Generation - Wii U vs. Playstation 4 vs. Xbox One
Fush and one other reacted to Cirevam for a topic
I found more statistics: I'm not sure what to make of this console generation. The last console I seriously wanted was the Gamecube, and the Wii was a bit "yeah sure, let's get one." I don't have any real interest in these new consoles, but maybe that's because I have a computer that's not trash. Before I got this one, consoles were my only option for quality gaming experiences.2 points -

LEGO Island 2 Beta Video
Jack Bluebeard reacted to lol username for a topic
http://www.youtube.com/watch?v=Gw1dK05bBNU Seems to be from fairly late in development, as it heavily resembles the final game, but there are some rather interesting differences. PeabodySam told me he saw this video years ago on an old disc... Now we can finally see it again. :D1 point -
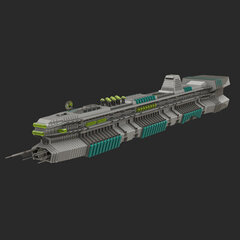
1:8 scale LMS Explorer
Ben24x7 reacted to Arthuriel for a topic
This is my latest creation. It has some flaws (e.g. the engines), but it was sometimes very hard to find the right pieces etc. Otherwise I chose this scale, because it was a challenge to build a smaller version which contains lot of details too. pieces: ~5000 to ~5300 bricks (depending on the version) building time: hmm, maybe 30 to 50 hours scale: not exactly 1:8 but very close to it (~1:8,25) (compared to my 1:1 scale version of the LMS Explorer, which is 975 studs long) construction program: LDD (but I have converted the model into ldr (MLCAD) and lcd (LeoCAD) files, too) dimensions: Length: 116 studs/ 91,36 cm/ 35,97 in. Width: 17 studs/ 13,49 cm/ 5,31 in. Height: 16 studs/ 12,70 cm/ 5,00 in. Picture (made in bluerender): Rotation Video (made with the bluerender rotation mode): https://www.youtube.com/watch?v=jI5mtplVLlk Older Render Pictures:1 point -
Removed Desert Adventure Dragway shortcut
Lair reacted to Cirevam for a topic
Watch out for The Brickster! He can trick you. But the point is that there is an inaccessible green brick below the current shortcut area. Thus, we can assume that the track used to be different so that brick could be collected.1 point -

Lego Time Cruisers comics
Fush reacted to alan for a topic
From what I read there, the small bubble says This would mean Are you ready, Doc? in English. I also guess that the bubble leading to Sparks is misplaced and should belong to Tim.1 point -
Lego Time Cruisers comics
aidenpons reacted to emily for a topic
This thread has taken a hilarious turn. I can't think of anything but to offer my applause to all of the expert translators we now have. ...oh.1 point -

Island SFM maybe possible?
le717 reacted to Wognif for a topic
As much as I'd like to mod the characters (giant torso minions?), until we drill the lights out of it to get a good look at the files, modding the characters is close to impossible.1 point -

The Great Kanohi Project
The Ace Railgun reacted to Alcom Isst for a topic
So I ended up with -snip- Its "mouth" is too thin, but it's too late now. Hope you like it Tahmira. No I will probably not do any more requests unless you bribe me or something. Taking it too literal?1 point -
The Great Kanohi Project
STUDZ reacted to Prototyke for a topic
I got bored today and wanted to draw something, but I didn't know what to. So I ended up with Its "mouth" is too thin, but it's too late now. Hope you like it Tahmira. No I will probably not do any more requests unless you bribe me or something.1 point -
King Kahuka Demo Car
Jack Bluebeard reacted to lopee for a topic
Hmm, im trying my self! There must be some way around it!! Thank you for contributing :-)1 point -

LEGO Island 2 Beta Video
tomfyhr reacted to Ben24x7 for a topic
I decided I would note the differences in this video compared to the Lego Island we all own and have. 1) apparently houses/buildings grow or shrink while spinning around. a reference to the PS1 version. 2) When driving a boat there is no water particles rushing out from the sides. 3) The bricks in the scuba diving mission are blue but turn red when you pick them up. 4) The clam's delay in the diving mission is shortened but could've possibly been made longer for the player to actually get out. 5) In the castle world there are knights on the bridge after it is repaired. 6) In the mummy's tomb there is a black fog inside. 7) At the area in the mummie's tomb where the constructopedia page is there are columns surrounding it. 8) because of the black fog the boulder cannot be seen. 9) In the desert car dash (I think that is what its called) mission the car is green, not red. 10) In the desert world the image for the diamonds are a different picture. 11) In the bi-plane mission there is a turquoise fog. 12) The Mr Hates camp mission has a white fog. 13) In the fishing mission there is no sky. 14) In the fishing mission there is some sort of speedometer in the bottom left. 15) In the spaceship training (I forgotten what it is called) the ground is not grey, instead it is tan. 16) In the asteroid field mission the sky is lighter, making the asteroids more easier to spot. 17) The rocket ship controls in the asteroid field game is simplified. 18) In the asteroid field mission the rocket goes faster than in the finale version of the game. 19) In the space parachute the 'parachute' is completely black. 20) The targets in both parachute missions don't flash or are not animated. 21) Is anyone still reading this?1 point