Leaderboard
Popular Content
Showing content with the highest reputation on 08/03/2013 in all areas
-
Damn Crystal Glitch!
Lair and one other reacted to Cirevam for a topic
You're doing exactly what you should be doing to edit the file, but your computer is evil. I'm guessing you installed the game into C:Program Files (x86) or someplace similar. Vista locks down that folder hard which makes modding Rock Raiders rather difficult. Move your LRR install folder to the desktop or someplace else where Vista doesn't ask for UAC permission all the time.2 points -

Tutorial: Skin Texturing
Rock Monster reacted to Jimbob for a topic
For my first tutorial on RRU, I'd like to make a simple guide on modding Lego Racers by creating custom textures for the models. These textures replace current textures, they don't add new textures. I've written quite a lot, you should be able to skim-read through if you don't have the patience. Preparing the Mod This is often standard procedure when modding, but if you're not aware of what to do, follow these steps. You will create a new directory for your Lego Racers game in which you can safely make a new texture mod. 1. Find the install directory of your Lego Racers game. 2. Copy the containing folder (LEGO Racers) and paste it in the same directory. Rename this new folder to something suitable, e.g. 'RacersModded' (I've purposely made it twelve characters for the next step). 3. Inside the new folder, you will find the LEGO.JAM. Download JMMB's JAM Extractor, and use it to extract this file. 4. You should now have two folders inside the main LEGO_JAM folder, 'GAMEDATA' and 'MENUDATA', ready for modding. Making the Skins The texture files for models in LEGO Racers can be found in GAMEDATACOMMON and MENUDATAPARTDB. While both use the same file, the former is for textures seen while actually racing, while the latter is for textures that you see in the menu section of the game. To mod a texture, you first need to download these template texture files, ripped from the PC game. Inside you will find a collection of files including heads, headgear, bodies, and legs. These are the templates you will use to create new textures. The textures are named using a simple system. Files containing 'CHST' refer to the torso, files containing 'DFLT' are the face, 'LEG(S)' are the leg of the model and 'HELMET', 'HAIR' and 'HAT' are obviously those pieces of headgear. In addition, files containing 'MAT' are for in-game AI opponent textures. None of these can currently be viewed, which is why you downloaded the template skins. I've given a small explanation of them below. So, you simply need to draw over the template files in any image editor to create new ones! The files must be saved as .BMP images, but can be in any resolution (so long as it is a power of 2), allowing for textures of a variety of qualities. Remember, the first four textures above will only affect the player textures - it is the MAT texture that is used for AI opponents. Adding the Skins All characters in the Lego Racers game have a two-letter name assigned to them which is used in their relevant texture files. Some characters (mainly bosses) have all four textures, while others will share the standard ones. The naming system for the racers are as follows (in circuit number order, followed by alphabetical order, the two letters to the left are the file names): You just need to change the file names of your textures to match the characters in-game, then copy the files into the GAMEDATACOMMON and MENUDATAPARTDB folders. Original Skin Textures I have ripped all of the skin textures from the game, and you can click the link below to download them (thanks Xiron for the HELMET2 texture). JJ's LR Texture Rips They are saved as BMP images with the exact same names of the game textures for your modding convenience I've kept the original screenshots I took below in case it's easier for people. Bodies Here are all the bodies found in the game. Faces Here are all the faces found in the game. Headgear Here is all the headgear found in the game. Legs This section isn't complete yet, as the method I used to work out the files doesn't quite work with legs. How the Textures Work To help even further, I have begun to determine how the game maps the textures onto the models. So far I have worked out the helmet, body and legs - feel free to use these textures as reference when creating your own textures. Helmet The yellow section is the main area. The white square at the lower-left is used for the rest of the helmet, and the line of colours above this is the visor. Chest The black areas are not used, and you can use the screenshots below to determine the rest. It is worth noting that in menu selection, the game uses the right hand to texture the left hand too, while in-game both hands use separate textures. In addition, the template textures have shading, suggesting that the textures may have been designed to be more advanced before the final release. Legs Again, the black areas are not used. The leg texture has (annoyingly) only three areas to colour. The yellow area is the main portion of the leg (thigh and that-lower-part-no-one-knows-the-name-of), and the green area is used for the belt section. The red area is used for the foot, sides and back, which unfortunately restricts texturing items such as shoes. Screenshots Recompiling The final step in texture modding is to recompile the mod. Once all the modified textures are copied into the folders, you can either recompile the main folder into a JAM file using the Jam Extractor, or run the game without the Jam Archives. Then, voila! You have successfully created a texture mod!1 point -

Legoland Cheats List
le717 reacted to Cyrem for a topic
I found these cheats while browsing through exe. I had a look on some cheat sites, but none seem to have them. Pretty much here is the ones I've found and their effects. While in the game, hold SHIFT and type these at the same time: SHOWCAPACITY >> Shows capacity information when press shift DIGGER >> "Set Switch 1" ... Not sure what the description means, but it had no effect for me. I MPROVISE >> Turns on freeplay mode. WELOVELEGOLAND >> Win the level. PRAISEME >> The appraisal report popsup. HARDASNAILS >> No Ride Wear & Tear COLDHARDCASH >> Gives you 5,000. DIE >> Immediatly closes the game. STOP >> Stops the music. WEST >> Western Music CASTLE >> Castle Music INCA >> Inca Music EGYPT >> Egyption Music ILIKETOTRAVEL >> Unknown, didn't seem to have any effect when I tried.1 point -
Fush's [non-LEGO] Rock Raiders Fanart
Jimbob reacted to Fush for a topic
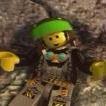
Feedback please? Both comments and questions are nice. NEW: The tool store.1 point -

Heightmap Converter
Sadie Meowsalot reacted to sheepandshepherd for a topic
Heightmap Converter Beta version NOTE: This has been replaced by >GeoTool. The source code got too messy to read, and Unity3d was limiting what I could do with it anyway. GeoTool is better This is a heightmap<->image converter utility to make one of the most annoying parts of creating a Rock Raiders map a bit easier. It can take any JPG or PNG image and save it as a High.map, with lighter pixels representing higher ground. The heightmap was always something I would have liked to do in GIMP with smooth and scaleable brushes. It can also convert existing heightmaps and surf maps to PNG images that you can use as a base when creating a new heightmap in your image editor. Finally, it will give you a quick 3D preview of how the map's terrain will look in-game. You can load up the surf map for a fully textured preview. For now, walls are not accounted for, but that is planned as well. Screenshot of RR level 9 loaded in the converter, with textured 3D preview active: The Load and Save windows are pretty self-explanatory: type in the path to your file, click "->" to preview the image or map, and then click LOAD/SAVE. If you enable 3D view, it'll generate a mesh from the heightmap. I currently use the estimate that about 8 height units equal the length/width of 1 tile (assuming flat ground, of course, not walls). You can also choose the material of the 3D mesh (the screenshot uses the textured surf map as the material). Controls for the 3D view are listed in the help window (the '?' button at the bottom right). You can customize the colors of imported surf maps using the "surfdefs.ini" config file. For convenience, I made the config file similar to the one used by Cyrem's old Map Tool, so if you ever made a custom color config file for that, you can just drop it in the data folder, replace the surfdefs.ini, and it'll load just fine. You can also change the textures used for each terrain type using the "surftextures.ini". This feature isn't very flexible yet and will be expanded in the next version. For now, files must be PNG or JPG and must be 64x64 size. Currently, it's hard-coded that when converting to an image, a height of 64 equals full white and height of 0 is full black. I don't think there's any reason to go above 64 height on maps, since the ground starts to disappear at that point. It's written in Unity C#. I'm still too much of a noob programmer to know how to make all this GUI and rendering stuff in regular .NET, so for now I'll let Unity do all that for me. This was mostly just a practice project for me, since I've just recently started programming. This is the Beta release -- the main features are complete, but I plan on improving and adding more to make it a more useful preview tool. Planned updates: Note: Thanks to the various things Unity includes in builds, the full program is a ridiculous 30MB, most of which is unused Unity stuff. Sorry about that -- I guess that's what I get for using a full multi-platform game engine to make a simple file converter. Ehhh. 7zip amazingly gets it down to 5.2MB though. Download - Beta version Previous versions Download - Alpha version1 point -

Hello Everybody!
ChromeLuigi reacted to le717 for a topic
Welcome to RRU! I think you'll find yourself at home here. Odd, I like Luigi too when I rarely play MKW...1 point -
Hello Everybody!
ChromeLuigi reacted to Teawater for a topic
Hello ChromeLuigi! I'm new too! However, unlike you, I've known about this site for some time. (However, I haven't been keeping any tabs on this site, though.) @Xiron: Yeah, and keep them UP as well! =)1 point -
Map Creator (0.9.11)
Cirevam reacted to alan for a topic
I know I already mentioned this, but it would be a great feature to this tool: Could you please, if you have time and if this even works, add a function that you can edit the size of your maps? And maybe, if that works, that you can choose the side where the added space to be attached at the 'original' size? That would make editing your own maps (for improvements, changes, ...) much easier! Thank you1 point -
RRU Anniversary Blog Party!
ProfessorBrickkeeper reacted to Cirevam for a blog entry
My favorite moment was when we lag-attacked everyone in chat with light spam.1 point -
Damn Crystal Glitch!
Lair reacted to Oboe Shoes for a topic
In the CFG, find this: WeaponTypes { ;SlowDeath <initial damage percentage of normal damage>:<duration> Lazer { SlowDeath 3.0:10.0 DefaultDamage 1.0 RechargeTime 30.0 Add DischargeRate 0.0 on the line directly under rechargetime. This should fix it.1 point