Leaderboard
Popular Content
Showing content with the highest reputation since 06/24/2025 in all areas
-

Welcome Rock Raiders United to the Mask of Destiny Network!
Thomkok23 and one other reacted to Lair for a topic
i posted this on the hell bird site when this was first announced but never posted it here. i'd say it's aged well (unlike tw*tter)2 points -
Moving Forward
fun and one other reacted to Thomkok23 for a topic
I understand where you're coming from, and I agree with you on one key point: no one should minimize the severity of what happened. That situation was absolutely a breach of trust, and the people affected by it deserved better from the moderation at the time. That said, I want to push back on a few things: A community doesn't cease to exist just because some of its veterans have moved on. Communities evolve. People leave, new ones arrive, and the culture shifts over time. That’s not unique to RRU — that’s just how communities work. Just because the current group isn’t made up of the same people as before doesn’t make it any less valid. I always notice the amount of guest accounts and it seems still very high to me. Veteran presence is not a requirement for legitimacy. It’s okay for people to outgrow a space. But it’s equally okay for others — even if they’re “post-forum-archive newbies” — to reclaim that space, rebuild it, and make something new of it. The forum may not be what it was back in the older days, but that doesn't make the current people still wanting to post any less of a community. People are allowed to want to fix or preserve something they cared about. Maybe RRU as it once was is gone — that doesn’t mean people can’t try to shape it into something better. That could mean rebuilding it with lessons learned, including stronger safeguards and a new tone. That effort doesn’t deserve scorn. RRU isn’t just about the past — it’s about possibility. For some, this place was meaningful, creatively inspiring, or a source of belonging. Those feelings can still exist, even if the original group fractured. If some people still want to share builds, mods, or memories here, they’re not clinging to a ghost — they’re creating something of their own. It’s okay that you and others have moved on. No one is asking you for everyone to come back. But let’s not act like the presence of existing and/or new people, people trying to do something positive to this forum is somehow invalid or misguided. We just want to keep posting on this forum and have proper moderation as it should have been.2 points -

Welcome Rock Raiders United to the Mask of Destiny Network!
JohnnyBricks reacted to Vahkiti for a topic
As some of you may be aware, ShadowDraikana, a Litestone Studios staff member, has been appointed administrator of Rock Raiders United in light of recent events on the site. As such, RRU has now officially joined Mask of Destiny as our newest partner! What does this mean for RRU moving forward? Well, for the most part, it'll be business as usual. Aside from some staff turnover, (Myself included in this process, hello! :p) and possible revisions to the rules, no major changes have been deemed necessary. The biggest change is that the site has now moved to Mask of Destiny's servers, and will be considered an equal member of our growing network. While Rock Raiders United is obviously not focused on the BIONICLE theme, as all previous members of the MoD network were, there was already a large overlap between MoD staff and the RRU userbase, so MoD providing hosting for the site was a no-brainer. With all that said, we hope that you'll continue to enjoy RRU for years to come, and that together, we can all better maintain the legacy of these discontinued themes. If you have any questions or concerns regarding these changes, feel free to sound off below.1 point -

Moving Forward
Thomkok23 reacted to JohnnyBricks for a topic
Lovely put, Thomkok23! Personally, I would love this forum to 'relaunch'. Crystal clear rules & morals. Safeguarding. Whilst many AFOLs love LEGO, so do kids - who need safeguarding. Moderate moderation is needed. I dislike people not being able to post new threads or on existing threads. Stuff like that sees a forum's community die and relocate elsewhere. A - Yes, those actions are absolutely wrong. I don't understand why action wasn't taken. Defiantly an important lesson. If RRU was to 'relaunch', safeguarding from moderators should be a priority! B - I accept people have moved on. I dislike the current state. Whilst I understand currently everything is being 'preserved', a forum should allow users to create threads, post replies on threads, etc. I've enjoyed many threads and gallery photos on here. It was interesting to see a user had recreated all the vehicles from the Lego Racers 2 videogame, for instance. I've somewhat struggled to find LEGO fan sites I enjoy. I've used EuroBricks, but 'specific things' on here made it stand out for me. The 'bad past event' only came to light for me from this 'Moving Forward' thread - I had no idea about it beforehand. If safeguarding and proper moderation could be achieved, I would like to see a relaunch of RRU. A fresh start, proper moderation, proper safeguarding, proper rules. I doubt it would ever affect a fan forum, such as this, but the UK has seen it's age verification law(s) kick into affect. OneID® has been used as a digital ID and age verifier, for instance. Specific websites cannot be accessed without logging in - safeguarding children.1 point -

Moving Forward
Lair reacted to Ben24x7 for a topic
A. More specifically: The "bad past event" was an Admin refusing to take action against a repeat offender whose presence on the site endangered underage members (ya know, the kind of young audience that a forum about LEGO would naturally attract). We trusted our moderation team to keep RRU a safe space for everyone, only for the highest ranking member of the moderation team to break that trust. B. WE have moved on... RRU as a community was dying before the child predator protection stuff came to light, all it really did was give us a reason to finally leave. And... in my personal opinion, it's the best thing that could've happened to this community. It helped us split away from the ex-members we disliked while reconnecting with those we found comfort in. I can't speak for all the friend groups or sub-communities that split off from RRU, but nowadays when I talk to my ex-RRU friends they feel refreshed... they're comfortable, empathetic and full of energy. When RRU is brought up, it's either the butt of a joke, or treated like a collective trauma we all went through. I do not understand why y'all are acting like there's still a "community". We've moved on. Getting the forums running again won't magically bring us back, y'all post-forum-archive newbies are the only "community" that's left. Yes, some of us miss being part of a forum community, but few of us miss Rock Raiders United.1 point -

Lego WorldBuilder maps
JohnnyBricks reacted to imlegos for a topic
Bonus Material #1 A tileset for making level layouts!1 point -

Rock Raiders Toolkit - LWO and UV exporting in Unity
Ben24x7 reacted to lol username for a topic
https://github.com/Terrev/Rock-Raiders-Toolkit This is a Unity toolkit that exports models to .LWO, and optionally .UV as well. It means you can author Rock Raiders models free of LightWave, and use proper UV mapping for the first time since none of us have UView (and who'd want to use it these days anyway?). You'll probably just want to use planar textures most of the time though, as you'll see later... Why Unity? So I didn't have to do a bunch of model importer and UI work, and cause there's been success using Unity for these sorts of things before (The Legend of Mata Nui - I made a dumb level editor for it - and someone also made a level editor toolkit in it for Dark Souls). Also, I *might* eventually look into LWS animation support, which could use Unity's built-in animation tools. No promises if that'd even work though. We'll see. TUTORIAL, PART 1: SOLID COLORS + PLANAR TEXTURES First, download Unity. https://store.unity.com/download?ref=personal Then download the toolkit - here's a direct link to a zip of it: https://github.com/Terrev/Rock-Raiders-Toolkit/archive/master.zip Open the project folder in Unity, and off you go. (You'll probably have a newer version of Unity than the version last used for this project - that's fine, it'll automatically upgrade it.) Once it's open, load the scene called... uh... "Scene". This scene has some lighting settings that I find convenient for this, already set up. (Default scenes in Unity have yellowish directional lighting and blueish ambient lighting, etc, to mimic an outdoors environment. I prefer to work with plain white lighting for this.) The default Unity layout will look a bit different from this - I prefer the Tall layout (Window -> Layouts) so that's what you'll be seeing here. Oh, I also prefer a one-column project tab. Anyway. Let's import our custom model. Make a new folder for it in the Project tab (use the + icon), then click and drag it in. (Note that if your model has textures, they must be imported at the same time as or before the model for Unity to assign them properly. Otherwise you'll have to manually assign them later.) You'll also want to make a "Materials" folder inside your new folder (it can be named anything, really). Then, in the model's import settings, click "Extract Materials..." and select the Materials folder you made a moment ago. This will expose all the model's materials for you to edit. Select them all, and change the shader to Rock Raiders. You can also change the shader to Rock Raiders Transparent - there's no difference between the two when it comes to saving a LWO, it only affects how they're displayed in Unity. The transparent version of the shader will just display transparency in Unity, while the other one won't. Now click and drag your model into the scene. The position, rotation, and scale it's at in the scene will be applied to the final exported model, so if you drag it directly into the 3D scene view, make sure you set its position to 0, 0, 0. Most models in Rock Raiders have a basic 1x1 LEGO brick as 2.5 units wide, and a plate is 1 unit high. (Some things, like minifigures, are scaled differently in their LWOs, then brought into scale with the rest of the game by other means such as their animations, so you'll have to compare to vanilla models to get the right size.) The model I'm importing here - a custom Electric Fence - is originally built in LEGO Digital Designer and then converted/exported to OBJ. In LDD, a brick is 0.8 units wide, and a plate is 0.32 units high (it's based on real life measurements in millimeters). So to bring it into scale with Rock Raiders, we have to scale it up by precisely 3.125. Now, let's set up planar textures. This is by far the most common texturing method Rock Raiders uses. The idea is you'll project textures from either the X, Y, or Z direction, like a film projector on a screen, and you can adjust the size and position of it. These will apply per material, so that's why I gave the tiles we want to texture their own unique materials on front. Import the textures you want to use, if you haven't already - I'm just using ones present in the vanilla game. Also assign them to the materials if needed. Don't really worry about how they look in the editor; we'll be setting up their size/position in a moment. But what values do we want for Texture Center and Texture Size to make it look right? Go to the Rock Raiders menu up top, and click Add Planar Texture Helper. Also do Add Measuring Tape - we'll use both together. Select the things you just added in the hierarchy tab, and move them wherever. To use the measuring tape, select an end of it, then press and hold V to use vertex snapping. Grab it by the bottom vertex of the pyramid, and snap it to a vertex on your model. Repeat for the other side, and voila! You can measure how far it is from one vertex to the other. You can also look at the Measuring Tape script on each of the ends to see the distance in case it's hard to see in the scene view, or automatically align the ends on an axis. With a couple measuring tapes, we can see the area we want to align our texture to is 2.5 units high and 5 units across. If you remember the standard Rock Raiders scale mentioned earlier, you may not have even needed to measure it. So let's change the scale of our planar texture helper to 5 on x (width), and 2.5 on y (height), and vertex snap it to the tile. Then, drag the material you want to set to this size/position into the Material slot in the Planar Texture Helper script, and click "Apply to material". We'll also do this to the material for the tile on the other side - we don't even have to move the planar texture helper in this case, since they're aligned on the axis we'll be projecting from anyway (z). If you look at the materials now, you'll see the values we want have been copied over. You can also change the axis the texture is projected from here - tick the box for x, y, or z. (The first one checked will apply; if none are selected it defaults to z.) You won't see how the planar texture will truly look in-editor, but if you use the planar texture helper, you should know what to expect. You may also have to make rotated/flipped copies of textures sometimes to make them face the way you want, as the original developers did - that's just a limitation of planar textures. Let's do some finishing touches, making the neon green bits transparent and luminescent. Now let's save it as an LWO from the Rock Raiders menu! It will export an LWO of whatever object you have selected, and its children. (This means you can also combine models by making them the child of the selected object; click and drag one model into another.) If nothing happens, look at the log - chances are there's a material in the model that doesn't have a Rock Raiders shader, and it'll let you know there. The Rock Raiders shader is needed so materials can have all the info needed for the LWO. And here's the model in-game! TUTORIAL, PART 2: UV FILES You can also save a UV file along with your LWO. This lets you use the UV mapping from the model instead of planar textures - for example, here's Sparky's head from LEGO Racers 2 ported to Rock Raiders: This method comes with various restrictions, however. Which rolls into the next section. TUTORIAL, PART 3: THE FINE PRINT (WAIT THAT'S ALL FOR PART 2?) Yeah. So here's some quirks, limitations, and other bits of trivia you should know about: The color value is entirely overridden by the texture in-game, if the texture is present. In Unity the color will tint the texture, they'll be blended together - that's just because I'm not actually sure how to mimic the logic of how the game does it with shaders in Unity (if that's even possible lol). Be aware that the "diffuse" value simply darkens the surface as it approaches 0. This is different from a lot of other programs, where "diffuse" is what the color value is called. Go ask the LightWave folks why, I guess (though apparently they outright removed it in later versions of LightWave). Additive Transparency means transparency is determined by the brightness of the color, where black is entirely transparent. This is most commonly used with textures, for things like smoke particle effects - so only the lighter, colored portions of the texture are visible. It technically does work with solid colors/no texture though. The Transparency slider is only for use without textures - if combined with a texture, it won't look correct. There's another method of doing transparency in Rock Raiders, where a single specified color is treated as transparent and everything else is not - this isn't handled in the LWOs though, but instead, the texture names. "Texture is a sequence" is for use with, well, sequenced textures. It simply adds the " (sequence)" text at the end of the texture path. "Write relative texture paths" probably doesn't have any effect, but let me know if you find out that it does. It has an effect in LWS files regarding the shared folder, but I have yet to find an effect in LWO files - the game seems to check the local folder for the texture, then the shared folder, regardless. I'm including it just in case. Pixel Blending controls if the textures appear smoothed out, or pixelated (think Minecraft). See this topic again for examples. If a texture is specified, but the game cannot find it, it will treat it as though it's using a solid white texture. Using a UV file will make every material on the model use a texture. If you haven't specified a texture for a material, but use a UV file, the game will see it as a texture it cannot find, and that material will be white in-game. (This actually happens on one of the Lava Monster legs in the vanilla game - one of the texture paths is just "null". Look at their legs as they walk and you won't be able to unsee it!) This means if you want a simple solid color on a UV mapped model, it'll still have to use a texture. This also means you can't use the transparency slider properly with UV mapped models, since everything requires a texture. If a model has no defined UV coordinates, but a UV file exported, that geometry will be given default UV coordinates of 0, 0. Using a UV file will force pixel blending to off; all textures on the model will be pixelated. This seems like either an oversight, bug, or something they were just okay with (the only prominent models in the vanilla game to use UV mapping are the lowest poly Rock Raider, and the Lava Monster). Seams/splits in UV maps will cause hard edges in the shading wherever they lie. This only applies to UV files, not planar textures. It's a pain in the ass. See the screenshot below, and the second reply in this topic for an explanation of why this happens. There's probably other quirks and limitations that'll be found as people play around with it more. Have fuuuunnnnn~1 point -
LWO to OBJ (and now XML), specifically made for Rock Raiders models
Ben24x7 reacted to lol username for a topic
HEY SO IF YOU EXPORT MODELS OF STUFF WITH .UV FILES (PARTICULARLY THE LAVA MONSTER) and notice "well gee, there's hard edges visible in-game, why aren't there in the exported models?" that's because there seems to be a bug (probably?) in the game where it introduces hard edges along seams in the UV map: I'm not implementing it into this exporter cause a) it's probably a bug they never noticed or bothered to fix cause UV files were used on so few things in the vanilla game, and b) it'd be kind of a pain in the ass so if you reeeaally wanna mimic how the lava monster actually looks in-game, just add hard edges wherever there's UV seams I guess. lol. f****ing 90s 3D games man1 point -
Rock Raiders Toolkit - LWO and UV exporting in Unity
Ben24x7 reacted to lol username for a topic
Ok, so. Pushed an update that fixes hard edges appearing whenever vertices are split in any way other than by normals/shading - well, almost. Turns out that seams in UVs from a UV file will *always* cause hard edges in the shading. Why? Despite how the LWO and UV formats store things, at the end of the day, a vertex can only have one of each attribute - one position, one normal, one UV coordinate, etc. (Well there are such things as multiple UV sets but that's not relevant to how this works or the problem at hand pls don't nitpick I mean they're just yet another set of attributes anyway right so like it doesn't matter that they're UVs at all blarghghgh.) So when you have to have a seam in your UVs, or a hard edge on a corner, you'll actually ultimately end up with split/duplicate vertices - identical in every way, sitting in the same place, except they might have different UV coordinates for a seam in the texture, or different normals to form a hard edge. Here's a really nice visual explanation I always point to. Though in this case, the problem has more to do when this occurs with UV splits. So what's the problem exactly? Well, the LWO format doesn't store vertex normals - the game calculates them upon loading. If vertices are split, that'll result in a visible hard edge. That's a-ok. Except, when you add UV coordinates to the mix, suddenly you have to split some of your vertices for those texture seams. This is pretty much functionally identical to unwelding them to control the smoothing of your model. If you do this step *after* you've already calculated your UV coordinates, you're fine. Your new split/duplicated vertices will still have normals that line up with each other, and so there won't be any visible seam. This is what the game does for planar textures - after all, planar textures are just info on how to calculate UV coordinates. But when the game instead loads UV coordinates from a UV file, it splits vertices to accommodate them *before* calculating the normals. And so, there end up being a lot of split vertices - and thus hard edges - you didn't intend there to be, wherever there's seams in the UV map. That's what seems to be happening anyway. There could be more weird factors to it. God knows what the game's really doing. Have fun with that :DDD1 point -
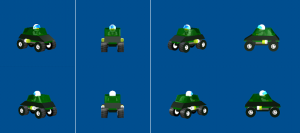
1. Custom Sandy Bay cars.png
Toa_Of_Justice reacted to dy_enforcer for a gallery image
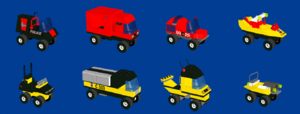
From the album: Custom cars from Lego Racers 2
Do note that each car I build is up to 20 bricks(19 bricks + 1 chassis) so it reaches its max limit. Also, Notice that each car has a specific color scheme on each of the theme. In Sandy Bay its mostly Yellow, Black and Red. UPDATE: There are a few changes to my collection so look out for them if you see one1 point -
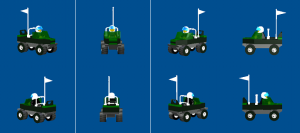
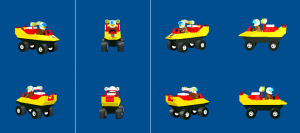
3. Custom Arctic cars.png
Toa_Of_Justice reacted to dy_enforcer for a gallery image
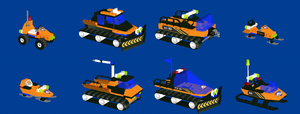
From the album: Custom cars from Lego Racers 2
Do note that each car I build is up to 20 bricks(19 bricks + 1 chassis) so it reaches its max limit. (Except for Arctic though I may change anytime soon so do stay tuned) Also, Notice that each car has a specific color scheme on each of the theme. In Arctic is of course orange and black with white and blue highlights UPDATE: There are a few changes to my collection so look out for them if you see one1 point -

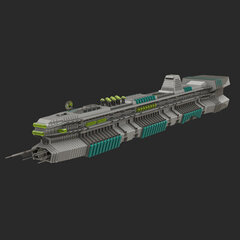
Lego Stunt Rally Mega Hurtz' Moon Buggy LDD Model
Toa_Of_Justice reacted to ChileDawg for a gallery image
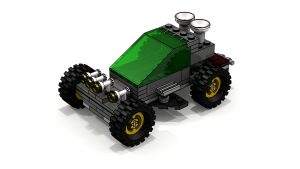
From the album: LDD Models
Mega Hurtz' Moon Buggy from Lego Stunt Rally, as best I could design it using LDD. Rendered with LDD to POV-ray Converter.1 point -
LEGOLAND Rocket Racers Vehicle
Toa_Of_Justice reacted to dy_enforcer for a gallery image
From the album: Custom cars from Lego Racers 2
Just build this car to pay tribute to the retired ride/game from LEGOLAND.1 point -
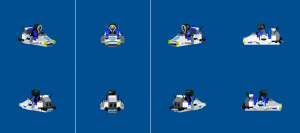
Xalax car 2.png
Toa_Of_Justice reacted to dy_enforcer for a gallery image
From the album: Custom cars from Lego Racers 2
I should point out again, I choose the color scheme black, white and green because I want to have each theme representing their own color. After all, this is LR2 not LR1 where custom cars reflect their personality. Anyways, here are my Xalax Cars. Once again, no comment, already posted this before.1 point -
Xalax car 1.png
Toa_Of_Justice reacted to dy_enforcer for a gallery image
From the album: Custom cars from Lego Racers 2
I should point out again, I choose the color scheme black, white and green because I want to have each theme representing their own color. After all, this is LR2 not LR1 where custom cars reflect their personality. Anyways, here are my Xalax Cars. To be honest, this is my first time doing a dual windshield on front and back. It reminds of a classic lego car but can't remember which one, looks dope though.1 point -
Mars car 5.png
Toa_Of_Justice reacted to dy_enforcer for a gallery image
From the album: Custom cars from Lego Racers 2
I'm going to upload two themes at the same time so I can finish this. Here are my Mars custom cars. Another hovercraft but much smaller compare of the two. Also, is it me or is this vehicle remind me of Rock Raiders? I don't know, please do leave a comment if what vehicle it is there.1 point -
Mars car 2.png
Toa_Of_Justice reacted to dy_enforcer for a gallery image
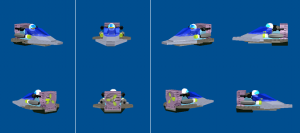
From the album: Custom cars from Lego Racers 2
I'm going to upload two themes at the same time so I can finish this. Here are my Mars custom cars. As always, no comment. Here is a link to my description of this hover car1 point -
Sandy Bay car 4.png
Toa_Of_Justice reacted to dy_enforcer for a gallery image
From the album: Custom cars from Lego Racers 2
As promised last week, I wanted you guys to look at every angle on how I created my cars. Starting with Sandy Bay This one also last week. Made some changes with this one as I replaced the 2x2 studless plate with the handlebar piece at the back. I also extend the slope brick with a 1x31 point -
Sandy Bay car 3.png
Toa_Of_Justice reacted to dy_enforcer for a gallery image

From the album: Custom cars from Lego Racers 2
As promised last week, I wanted you guys to look at every angle on how I created my cars. Starting with Sandy Bay This was a few weeks ago, and I already posted this one before but just in case, I have form all the angles into one picture so you guys can see all of it.1 point -
Sandy Bay car 1.png
Toa_Of_Justice reacted to dy_enforcer for a gallery image
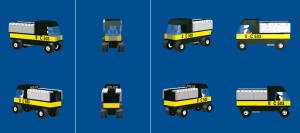
From the album: Custom cars from Lego Racers 2
As promised last week, I wanted you guys to look at every angle on how I created my cars. Starting with Sandy Bay As per today, I made two new ones. The first car, or should I say truck, is made just recently. EDITED: I re-made the truck to make it look like a supply truck, and it looks better than the one I made. I also added a police logo at the back thinking that this truck belongs to the police but its also part of coast guard.1 point -
The "Arth" Show presents: A (not serious) review about an older Lego clone brand set (9605 Sea Diver from Enlighten)
Ben24x7 reacted to Arthuriel for a topic
Note: As mentioned above this isn't intended as a serious review, but more as a random rant about a set I have at home, which isn't made by TLC. Note 2: I put this post into the "General" section, because it isn't a real review, but on the other in some way related to TLC or bricks in general (well, it's made out of bricks^^) Note 3 (2014-Mar-15): Due to the help of JimbobJeffers and jamesster I can confirm with a probability of 99,9%, that this set is based on the 6115-1 Shark Scout from TLC (http://brickset.com/sets/6115-1/Shark-Scout) and that it was made by the company Enlighten as part of the so called "Shifty" series (please click here: (http://www.reasonablyclever.com/bootlegtoys/index.html) on the right pane on: Other --> Legos --> Shifty). (And this set is very shifty indeed ). Welcome to the "Arthuriel reviews something, what he found at home" Show with a diving themed set from a Lego clone brand! 1. Intro: You know those toys, which makes you happy, while playing with them? Well, then don't read any further, because today I will show you a set from the other side of the happiness-scale. How did I even managed to get this set? Well, there was no escape, no warning sign, nothing... it was a... ...uhm... PRESENT. SURPRISE! HAHAHA, now I'm stuck with this abomination from the deep trenches of the sea forever. Ahaha, Ahaha, haha... ...bahhh *begins to cry* after some hours of calming down: Okay, I'm fine now, but the question is: how long? *looking at the set in fear* I got this set in poland in the early 2000s. I don't have the instructions or the box and the bricks are free from any logos, which could give a hint. My only memory bit, which could help to indentify the company: Afaik the company logo was a red 2*3 brick and the set on the box cover wasn't the same as the real set in the box. Here is also an overview of every piece in this set (taking this set apart isn't recommended by me, because some parts will break down very easily): 2. The "epic" background story (which is based on true events and totally not made up by me. I swear!): Bob was the last descendant (sort of...) of diving themed sets like Aquanauts, Atlantis or Diving. One day everyone in aqua land died of a horrible plague and Bob became the last Aquanaut. Some of you may think, that this was horrible and I will agree with you, but all those events became a small inconvinience in comparision to the following fact: He wasn't really an Aquanaut. He wasn't even from TLC. No, he was a Derp-o-naut... ...known for their unknown origin and their low attraction to quality, they annoy sailors, environmentalists and everyone else on the world with their behaviour and cheap vehicles, which break up easily and contribute to the pollution of the oceans. Even their style of living and their health status is worrying, but I will get to that rather quickly... 3. Bob and his submarine-boat-thingy (replacing the main part of the review with a dialogue, where I talk to myself a fictional figure) 3.1 Introducing Bob: This is Bob and his "vehicle" (moving pile of garbage). From the long days of hanging around at the water surface (and below) he got a bit bleached out, although this doesn't quite explain all the colour variations (protip: don't look at the pants, if you want to keep your sanity) ... The working conditions at his job aren't that good either. I mean look at his hands. They are bloody. Did he fight TEH Kraken with his bare hands and won (or is he secretly a member of the crab people)? Wow, that's really scary, but I don't know, for how long he can do this, because he has already big cracks in his forearms: Hmm, maybe he isn't that brave after all, because he doesn't look very stable and his pants, oh his pants... Bob: What's up with my pants? Me (Oh snap, he noticed me!): Well, they are yellow-more-greenish... Bob: Nah, that's normal. Although they weren't always that way. Me: (unsurprised) Wow, really? Bob: Yeah, orinally they were white, but then they got for some reason yellow and later even green. Me (rolling my eyes): Okay... (too much information)... ...lets move on... ...TO THE HELMET 3.2 The helmet: Oh, the helmet. Yes, the helmet... ...a chapter full of fun and frustration... Me: Hey, Bob. The helmet is hiding half of your face. Could you take it off, please? Bob: Of course, but it's a bit complicated, because the helmet fits extremely well. Step 1: Move arms Step 2: ??? Step 3: Profit World Domination Do something really stupid. Good, mission accomplished. Me: *bashing head against a wall* Oh boy... Bob: My head got stuck in the machine helmet. Could you help me? Me: (Why? Just why?) Okay, time to use the screw driver. Before: After: Bob (after I put his head on his torso again): Thanks, Pal. Me: I'm not your pal, buddy. Now show me your vehicle in more detail, please. Bob: Okay, but first I will have to put my helmet on again. Me: Ah, the stupidity. It burns! Bob: What? Me: No, nothing. Just show me your underwater-boat-submarine-thing. 3.3 The "Vehicle" (even an origami boat is more reliable than this): The old Derp-Boat-Submarine, now with the efficient one bladed rotor design! Buy one and buy three more cuz they gonna break down. Hard and fast. Our Motto: In space everything is possible, underwater not so much Bob: Well, I must go. My local garbage pile needs me. Into spess! Me: . Wait. Wait. Wait. I thought, you were a man of diving and now you suddenly want to go into space! Bob: Yes, into spess! Me: That makes no sense! Bob: Neither do make the colours of my pants. Me: Aaargh, don't mention your stupid pants again and please go away forever! Wait... ...your view is hindered by your stupid helmet. Bob: Trust me, I am a man of advanced madness and stupidity. I can find my way home. 3.4 Accident, the End and a guest appearance 5 seconds later (at least it's a step up for the vehicle): Bob: What happened and where is my head? Bob's head: I'm right over here. Bob: I'm coming. In the name of quality and everything else, that I lack of! Bob: Arrrgh... Me: Noooooo, I can't stand this anymore! Back with this set to the hottest place, I know of: The oven! Bob: Ahhhhh, have mercy on me... Me (watching him and his vehicle melting in the oven): Yes, YES. Burn Derp-o-naut! Hmm, though I wonder, where you originally came from... Infomaniac's reaction shot after finding out, that Bob originally lived in the Phanta Sea... 4. Summary: I heard, that most reviewers here make different categories with a 0-10 scale and an overall score. So I did the same and also added a commentary to each random number: Frustration: 7/10 The bricks don't fit well together (though it varies) and some parts are very fragile (like the arms or the levers) and broke down as times passed by (like the rotor). At least you can throw it against a wall or use it in self defense (the helmet and some parts have sharp edges). Price: ?/10 Uhm, I don't know. It was a present, but I would guess, that it only costed a few Zloty (the polish currency). Uglyness: 6/10 I can remember, that the set on the box looked much better. The best example in this regard are the printed parts. On the cover they were multi-coloured, but in reality they are only made in one colour and even that was appearantly too complicated for the company: the amount of colour is unevenly distributed Instability: 7/10 It's less stable than some unstable chemicals like, uhm... ...ah, I'm too lazy to look some examples up. I already mentioned, that some bricks are very fragile or are already broken (the one bladed rotor or the arms). Overall Hate Score: 7/10 I hate this set, but it's still not enough to lose all sanity and laying around in corner and thinking, that the walls are speaking to you (* insert scene, where I'm sitting in the corner, turning my head slowly 180 degrees around and saying in a high pitched maniac voice while grinning like a madman: "Arthuriel wannah plaa-yaaah!" *) That's all for today. Next time (which will probably never happen. MUHAHAHA) I will review another useless thing on the "Arth Show". Maybe even something TLC related. Bonus feature: Update (2019-09-13): I fixed all the images since they were broken and made a note a bit clearer and yes: Bob and his low budget underwater vehicle still exist (against all odds or rather cheapness).1 point -
Welcome Rock Raiders United to the Mask of Destiny Network!
JohnnyBricks reacted to Lair for a topic
so the decision to keep the site as an archive has changed again? hm.0 points -
Installing LEGO Creator: Knights' Kingdom on Windows 10
amoebame reacted to MasterSushi for a topic
No problem glad to have made your year haha. It boggled my mind too until looking in the 3D Control folder and noticing it. A very nostalgic game, the music and gameplay bring back so many memories PCGamingWiki is a very useful resource. However for Lego Creator Knights Kingdom, there was no information for the game yet, so even if you checked, there would be nothing listed until just yesterday. With dgVoodoo2 working, you can enable Anti-aliasing which makes the game look significantly better. You can't override the resolution unfortunately, however I discovered that Superscape's engine stores a few registry keys that specify resolution. The Superscape registry keys always get overridden when the game launches, maybe denying some permissions in the registry could do something. The black cut-scenes (except the intro) might be due to how the game is split across the two .exe's, making it struggle to render movies properly. Also the raw music files can be viewed in DirectMusic Producer and played back (drag all the files from one of the folders for each song) in high quality, since the game uses DirectMusic. All of this applies to LEGO Creator too, since it uses a slightly older version of the engine.0 points -
Rock Raiders has hotkeys, apparently
Ben24x7 reacted to baraklava for a topic
In the Lego.cfg file there has always been a very confusing reference to keys. They did not appear to do anything. The only game-interaction hotkeys ever appearing were in Rock Raiders' debug mode. Recently, a document was unearthed about Rock Raiders hotkeys. To make a long story short: 1. To use hotkeys you have to hold F2 and click the selected hotkey 2. Hotkeys are rebindable in the Lego.cfg file in the "InterfaceImages" section. The last entry of each row refers to a key. search "KEY_M" for an example. Now that's a 20-year old secret hiding in plain sight! Edit: Also worth mentioning that in Eye View, Z and X makes your character strafe, which I learned fairly recently myself0 points