
Leaderboard

Popular Content
Showing content with the highest reputation on 04/20/2014 in all areas
-

A game I'm working on: A 3D, multiplayer roguelike (Released on Steam June 23rd, 2015)
Cirevam and 10 others reacted to Addictgamer for a topic
Hey guys: So, I joined a game dev team. Since then, I've been very busy working on this game: Barony, a 3D, multiplayer Roguelike, which, has further-since been greenlit and available on Steam since June 2015! ** UPDATE JUNE 2016 ** Earlier this year, we have released a graphics overhaul, among continued new patches fixing bugs and adding new features. Additionally, as of June 27 2016, Barony is open source, licensed under the GPL 3.0. Github repository here. Here's some screenshots of the new version: Pre-2016 graphics-overhaul Screenshots:11 points -

Minecraft Screenshots
aidenpons and 2 others reacted to Wognif for a topic
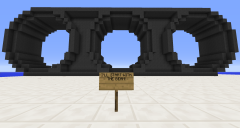
Somewhere on the ocean on the server, I have (tried to, anyway) created a giant Technic beam. Because I felt like it and couldn't think of anything else.3 points -

Welcome to a blog for comedy
The_Zerg_Swarm and one other reacted to TheDoctor for a blog entry
This blog post.2 points -

RRU Quotes 2: Reckoning
Brigs and one other reacted to STUDZ for a topic
[16:41:50] Bug Catcher: I'm trying to look up something on brickipedia and I'm getting stared down by images of pregnant unikitty from the recent images box no matter what page i go to. [16:42:15] Bug Catcher: ...the very fact that there is more than one is a little disturbing. [16:42:26] jamesster: isn't the internet amazing2 points -

Tutorial: Adding Custom Decals into LDD
Zed reacted to Jimbob for a topic
Adding Custom Decals into LEGO Digital Designer As great as LEGO Digital Designer is, it doesn't contain all the textures ever produced by the LEGO group. This tutorial will show you how to mod in custom textures to LDD so that you can use them in your models, and includes a little section at the end on setting these models up for rendering in POV-Ray. In order to add custom decals into LDD, you will need the following: LIF Extractor by JrMasterModelBuilder Notepad++ (or any decent text editor, this is free and recommended) A decal in PNG format Step 1: Preparing LDD Before you can add in custom decals, you'll need to prepare LDD for modding. To do this, you will use the LIF Extractor you downloaded previously. Navigate to your Application Data directory, and locate LDD's folder. On Windows 7 this path should be: C:\Users\YOURUSERNAME\AppData\Roaming\LEGO Company\LEGO Digital Designer Inside you will find, among other files, a large file called db.lif. This file contains all the decorations that are loaded into LDD, in addition to various other files. Now open the LIF Extractor in a new window. Navigate inside the folder relevant to your operating system - for my 32 bit computer, this is LIF_Extractor_Win_32bit. Drag the db.lif file onto the LIFExtractor.exe file inside, and it will begin the extraction process. This might take a while depending on your computer - on my Windows 7 netbook it took almost an hour, but on my old Windows XP laptop it took about a minute - so feel free to pop off to the nearest Support Station for a sandwich. Do not get impatient; just wait for the command window to disappear. Once it does, the extraction is complete. Ta-da! You'll see a shiny new folder called db sitting next to the db.lif file. Now, to set LDD to run from this folder rather than the db.lif file, simply rename the db.lif file to something else (don't delete it - you'll want to keep it as a backup). In this example I'll rename it to originaldb.lif. Your folder should now look like this: That's it, Step 1 is complete and you're all set! Step 2: Adding Custom Decals Now to the main part of this tutorial. Adding custom decals into LDD is actually very easy, and you probably won't need to refer to this tutorial any more after your first few tries. Open the db folder you extracted in Step 1. There are several files and folders here, but the only two we're concerned with are Decorations and DecorationMapping. I have highlighted them in the image below. The Decorations folder contains over 1,500 PNG images, all of which are used as decals on bricks and minifigure parts. The DecorationMapping.xml file is just one big list of all these files, and tells LDD which parts these decals should be available to. To add your own decal into LDD, simply save it in PNG format (if it isn't already) and copy it into the Decorations folder. The important thing is that you must now name it with a unique 5-digit number (plus the extension, of course). You can give it any number, so long as no other file in that folder already has it, so in this example I will use 10001. Here you can see I've created a masterpiece of a face decal and placed it in the Decorations folder. Now that the decoration is in the correct location, go back out into the db folder, and open DecorationMapping.xml in Notepad++ (or another decent text editor). You will see, after the first two lines, an indented list many lines in length. The format is: <Mapping decorationID="54580" designID="3626" surfaceID="1"/> The decorationID number is the name you gave your decal in the Decorations folder, excluding the extension. If you remember, in this example it is 10001. The designID number refers to the part that the decoration can be placed onto - in this case, it is 3626, which is the minifigure head piece. Tip: To find out the number of a particular piece, look for a decal that the relevant piece currently uses in the Decorations folder (for example, 55071). Then search this number in the DecorationMapping.xml file, and the associated designID is the part's ID (55071 has designID 3070, hence the 1x1 tile piece's ID is 3070). My custom decoration is intended to be used on a minifigure's head, so I'll leave it as 3626. Copy any line you wish and paste it at the top of the list, after the first two lines (or manually type a new one). Then change the decorationID to your decal's name, and the designID to your part's ID. By placing your decoration at the top of the list, LDD will read it first, so it will appear at the top of the decorations list in the application. Save the file, close it, and you're done! Step 3: Checking Out Your New Decal Launch LDD and enter LDD Extended mode. You can do this by selecting View > New themes > LDD Extended. Place the part you added a new decal to, select the Decoration tool (found by first selecting the Paint tool), and click on your model. If all goes well, the first decoration in the list should be your newly modded one! But what happens if you want to distribute this file? Well, the decoration ID of each part is saved to the file. If you save your model with a custom decal on it, then load it into an unmodded (or modded without the current decal in it) version of LDD, it simply won't appear. The part is still registered as containing that decal though, as mentioned previously, and therefore if you open the file in a correctly modded version of LDD it will reappear again. This means that you can distribute your .LXF files either with standard decals, for users with unmodded version of LDD, or containing the modded files so that other people can use them too. Or both, which is probably better. One final note: le717 pointed out that updating LDD will cause any current mods to be lost, so you will need to backup your decals somewhere else and reinsert them into LDD each time there is an update, starting from Step 1 of this tutorial. Rendering Models with Custom Decals You've just finished building an AWESOME model using custom decals, and want to render it in POV-Ray*. But the POV-Ray converter requires that you use an unmodded version of LDD, so what do you do? It's very simple. After saving your model, change all the decals in it to any standard decals that LDD uses by default. Save a new copy of the file, and then rename your originaldb.lif file back to db.lif. When you load the LDD-to-POV-Ray converter, there is an option to render with custom decals. Just tick this, and replace all the decals with your own ones. Remember, if you want two of the same part (a minifigure's head, for example) to use different decals in the same model, you will need to give them both different standard head decals. The LDD-to-POV-Ray converter changes each individual decal for all parts that use it in a model. *Not sure how? Check out le717's tutorial here.1 point -
2014 04 20 13.17.59
rioforce reacted to Wognif for a gallery image
From the album: Wognif's creations
1 point -
A game I'm working on: A 3D, multiplayer roguelike (Released on Steam June 23rd, 2015)
McJobless reacted to STUDZ for a topic
This... Looks like a 3D version of those old DOS games (DOOM, Wolfenstein, I.M. Meen, etc.). IT LOOKS GLORIOUS. Yes, a lot of it ends up looking like a Minecraft clone (one of many), so in spite of this, you may lose interest. I know a few people who would write this game off as "another dungeon crawler but with a Minecraft art style and a dash of DOS". As I look more into this project, I see more and more similarities to Minecraft. Mods, blocks, those levers. I understand this is still in EARLY development, but I'd keep an eye out on making the visuals more distinct from Minecraft. BUT THAT'S MY OPINION. Regardless, I like this. As soon as I have a few bucks to throw at this game, you can expect fifty dollars from me. I'll spread the word to a few of my IRL friends who would likely be interested, as well as some of my Steam groups. Best of luck on hitting that $8K goal and beyond, addict!1 point -

A game I'm working on: A 3D, multiplayer roguelike (Released on Steam June 23rd, 2015)
McJobless reacted to lol username for a topic
Yay, I was wondering when RRU would get a topic on this. Looks interesting, I'd back it now but I'm totally broke at the moment. I will definitely spread it around though.1 point -

30 Screenshots #1
aidenpons reacted to vitawrap for a topic
OH MY GEEZ, You caught me in pictures !1 point -
Having problems with IXS? Try enabling VSync (also, Anti-Aliasing)
lukas.tcn reacted to lol username for a topic
A while back, in another topic, intrepidowl mentioned that he was able to force VSync on Island Xtreme Stunts in his graphics control panel, to fix its framerate issue: This can fix quite a lot of issues the game may have - broken physics, extremely sensitive skateboard grinding, boats and airplanes breaking the game, Wave Catcher being nearly unplayable, etc. Other things to try include enabling compatibility mode and running without a disc. Another nice little thing you can enable while you're in the graphics control panel is enabling anti-aliasing, which IXS doesn't normally have. The details of doing this depend on what sort of video card you have, just poke around and see what you find.1 point -

LRR Map Expander
aidenpons reacted to Alcom Isst for a topic
So, after spending a little over three months in a programming introductory course that focuses on C, I decided to use my new abilities to make a modding tool. More specifically, a modding tool that increases the size and boundaries of .map files and modify the accompanying .ol file to match. I never actually asked if we already had a tool like this, I wanted this to be something of a surprise Christmas present for RRU. I did scan the RRU forums and investigated the LRR Map Creator and found nothing that increases the size of maps, so I proceeded. Although I would have proceeded anyways, as this is a major item in my mini-portfolio to RIT's IGM (Interactive Games an Media). The purpose of this tool is to grant LEGO Rock Raiders modders the ability to expand the size of their maps. This allows modders to repair the common error of maps having borders that are too thin, and add new areas beyond the current border of the map. Anyways the result of my efforts: LRR Map Expander LRR Map Expander source code Features Ability to handle all .map files and the .ol file if they have the same names as files exported by Map Creator v0.9.8. Ability to increase the width and height of the map by the same integer. HeightMatch, which aligns the height levels of the expanded borders with the map's center. Not included Ability to handle appropriate files with names different from those exported by Map Creator v0.9.8 Ability to increase the width and height of the map by different integers. Known bugs None.1 point -

LEGO Rockraiders FPS
coffins reacted to Redacted for a topic
Hey there people, it's me again. 3 years ago in summer holiday (almost 4 years ago) i started working on a game. A mod to be exact. It was a Rockraiders FPS game on the WOLF3D engine. after a while the engine got changed to the Doom engine. It took a lot of work, especially since i was just a 12 year old kiddo that had no expierence with game development exept for gamemaker. When all the maps were finished i needed to start working on sprites. at that point i realized that i am a terrible graphic designer and the game itself was terrible too, so i just left it and never looked back. 3 years have passed after that and i gained a lot of expierence with game developing. released 5 games under the name 'PascalGamesStudios' wich contained 2 LRR related projects. One of that was called LRR-Arcade. A game that i am not happy with, it doesn't run smooth, has no real story and just is plain boring. With a lot of hard work i managed to fix alot of problems with the framework i've been using and learned some stuff about quality. I tried to make a SP game out of it but failed becouse of the lack of inspiration for maps. That project got cancelled (like most of my projects ) 3 months had passed after that and a lot of terrible and great things have happend. After some time i got super bored and decided to look trough my old dropbox account. There i found the old .WAD file (Doom mod package) was the mod that never got released. it contained all the maps to the boss battle and then i realized that i still had that project from 3 months ago. so now LRR-FPS is getting one last engine switch. TL;DR I am working on LRR-FPS again after 3 long years, only this time on an new engine. The project page can be found at IndieDB. I am really looking forward to finishing it since i can finally add the stuff i wanted in it back in 2010 (cutscenes, voiceacting etc. ) Images: Link to old topic I hope that this will turn out great. Thanks for listening! -Pascal1 point -
Does anyone still play this? (My LEGO Network)
aidenpons reacted to Alcom Isst for a topic
I got up to rank 7. MLN shouldn't count as a social networking site. The only way you can communicate to others through it is by soulless preset messages. It's closer to a puzzle and teamwork game, where you gather resources through various ways from NPC users and secret NPC users. Like a social networking site, you have your own page, on which you can place modules. Modules can receive clicks from other players. Advanced modules you gain later on allow you to gain specific resources per day, and/or resources per clicks. Clicks are limited though, as each user only gets a specific number of clicks per day. Users have 20+8*rank clicks to spend each day, that accumulate evenly across the day. Rank is determined by the number of masterpieces you have made. Masterpieces are made from gaining a masterpiece blueprint, and gathering the resources the blueprint states. Each rank, from 0-9, has a masterpiece to go to the next rank, so there are ranks 0-10. Rank is the primarily a status symbol in MLN. Each rank has its own NPCs that will only friend you at that rank. By friending an NPC, you can trade with it on its page, or send it mail for hints or items. There are a wide variety of resources in MLN. The most basic are bricks. You start off with red bricks, but eventually have to deal with blue, yellow, green, purple, orange, black, white, grey, and clear bricks as you advanced in rank. You also have to gather an odd variety of items to complete blueprints for masterpieces, modules, or items. Items or resources are also required to click on specific advanced modules. Modules give you plenty of options of how to set up your page. Your page is a 3x4 area, and modules take up either a 1x1, 1x2, or 1x3 space. The main goal of MLN is to get each rank and masterpiece. You can also attempt to friend secret NPCs, or side plots that don't deal with rank, such as the Bionicle Plot. The higher you go, the more complex it gets, and the more teamwork you need. By rank 5 I needed to make a bot to continue, as I was forever alone. Also, I seem to have gotten carried away with this post. I would be interested in working with a team to get to rank 10.1 point