
Leaderboard
Popular Content
Showing content with the highest reputation on 07/07/2014 in all areas
-

Idea for RRU parody or skits... ...thing...
Ben24x7 and 3 others reacted to Yajmo for a topic
Just kidding. Yeah, these are both products of lazy animating. I'll try and clean it up a bit. Okie dokie4 points -
Idea for RRU parody or skits... ...thing...
Wognif and 3 others reacted to Yajmo for a topic
Sorry for bumping this old topic but, honestly I feel like this could be a great idea and could have some funny moments. I started animating this a while back when this topic was relavant but then forgot about it. Its a pretty basic animation but I felt maybe I would start and then various members could contribute and then we combine all the segments. http://youtu.be/pG_egAvyG_M Also I can render this better this is just a quick prerender because Its such a short scene.4 points -

LR2 Skin - Harry Cane
Fifi La Fume and 2 others reacted to Zed for a topic
I am starting to get the hang of texture modding for LR2, and I am now releasing my work for the first time: This skin overrides the blue aviator helmet, Sam Sanister's character builder faces, the brown jacket with gloves torso and black legs with gray belt. To make the lower side ends of the helmet brown, a new texture has been created in game dataCOMMONTEXTURES along with a new .md2 file so that the helmet uses it instead of COL_BLUE.MIP. Download: https://ore.rockraidersunited.org/legacy/LR2_Harry_Cane_821549.zip3 points -
Idea for RRU parody or skits... ...thing...
ProfessorBrickkeeper and 2 others reacted to Cyrem for a topic
That is one quality intro. Also makes complete sense since LEGO games always fall short of potential.3 points -
Green Riegel
Firedude34 and one other reacted to Zed for a topic
Includes versions both with and without pants. Overrides Riegel's original textures in game dataALIENS. The skin does not interfere with the low-poly environment Martians, but the one piloting Riegel's mech still has teal skin. Once I have found the textures for them and the .md2 file for the mech, an updated version will make the pilot green while leaving the others teal. https://ore.rockraidersunited.org/legacy/LR2_Green_Riegel_333955.zip2 points -
Idea for RRU parody or skits... ...thing...
Wirza and one other reacted to Arthuriel for a topic
@Yajmo: Your intro gave me an idea: How about an alternate version of the RR intro, where the asteroid misses the LMS Explorer and Chief just says: "That went well." As a bonus the RR end credits could be added after that.2 points -

Getting your head in the game
aidenpons and one other reacted to ProfessorBrickkeeper for a gallery image
From the album: Glitching Games
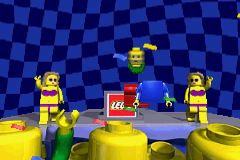
Clearly the EMTs working on Sandy Bay borrow many of their techniques and tricks from Return and Enter. (The picture is of a glitch which occurs in the podium scene following winning a race in LEGO Racers 2 (GBA))2 points -

Idea for RRU parody or skits... ...thing...
ProfessorBrickkeeper and one other reacted to lol username for a topic
Only part I'd change (aside from rendering stuff) is getting rid of the ... at the end. Just leave it hanging the whole time.2 points -

Tutorial: Adding Custom Decals into LDD
Zed reacted to Jimbob for a topic
Adding Custom Decals into LEGO Digital Designer As great as LEGO Digital Designer is, it doesn't contain all the textures ever produced by the LEGO group. This tutorial will show you how to mod in custom textures to LDD so that you can use them in your models, and includes a little section at the end on setting these models up for rendering in POV-Ray. In order to add custom decals into LDD, you will need the following: LIF Extractor by JrMasterModelBuilder Notepad++ (or any decent text editor, this is free and recommended) A decal in PNG format Step 1: Preparing LDD Before you can add in custom decals, you'll need to prepare LDD for modding. To do this, you will use the LIF Extractor you downloaded previously. Navigate to your Application Data directory, and locate LDD's folder. On Windows 7 this path should be: C:\Users\YOURUSERNAME\AppData\Roaming\LEGO Company\LEGO Digital Designer Inside you will find, among other files, a large file called db.lif. This file contains all the decorations that are loaded into LDD, in addition to various other files. Now open the LIF Extractor in a new window. Navigate inside the folder relevant to your operating system - for my 32 bit computer, this is LIF_Extractor_Win_32bit. Drag the db.lif file onto the LIFExtractor.exe file inside, and it will begin the extraction process. This might take a while depending on your computer - on my Windows 7 netbook it took almost an hour, but on my old Windows XP laptop it took about a minute - so feel free to pop off to the nearest Support Station for a sandwich. Do not get impatient; just wait for the command window to disappear. Once it does, the extraction is complete. Ta-da! You'll see a shiny new folder called db sitting next to the db.lif file. Now, to set LDD to run from this folder rather than the db.lif file, simply rename the db.lif file to something else (don't delete it - you'll want to keep it as a backup). In this example I'll rename it to originaldb.lif. Your folder should now look like this: That's it, Step 1 is complete and you're all set! Step 2: Adding Custom Decals Now to the main part of this tutorial. Adding custom decals into LDD is actually very easy, and you probably won't need to refer to this tutorial any more after your first few tries. Open the db folder you extracted in Step 1. There are several files and folders here, but the only two we're concerned with are Decorations and DecorationMapping. I have highlighted them in the image below. The Decorations folder contains over 1,500 PNG images, all of which are used as decals on bricks and minifigure parts. The DecorationMapping.xml file is just one big list of all these files, and tells LDD which parts these decals should be available to. To add your own decal into LDD, simply save it in PNG format (if it isn't already) and copy it into the Decorations folder. The important thing is that you must now name it with a unique 5-digit number (plus the extension, of course). You can give it any number, so long as no other file in that folder already has it, so in this example I will use 10001. Here you can see I've created a masterpiece of a face decal and placed it in the Decorations folder. Now that the decoration is in the correct location, go back out into the db folder, and open DecorationMapping.xml in Notepad++ (or another decent text editor). You will see, after the first two lines, an indented list many lines in length. The format is: <Mapping decorationID="54580" designID="3626" surfaceID="1"/> The decorationID number is the name you gave your decal in the Decorations folder, excluding the extension. If you remember, in this example it is 10001. The designID number refers to the part that the decoration can be placed onto - in this case, it is 3626, which is the minifigure head piece. Tip: To find out the number of a particular piece, look for a decal that the relevant piece currently uses in the Decorations folder (for example, 55071). Then search this number in the DecorationMapping.xml file, and the associated designID is the part's ID (55071 has designID 3070, hence the 1x1 tile piece's ID is 3070). My custom decoration is intended to be used on a minifigure's head, so I'll leave it as 3626. Copy any line you wish and paste it at the top of the list, after the first two lines (or manually type a new one). Then change the decorationID to your decal's name, and the designID to your part's ID. By placing your decoration at the top of the list, LDD will read it first, so it will appear at the top of the decorations list in the application. Save the file, close it, and you're done! Step 3: Checking Out Your New Decal Launch LDD and enter LDD Extended mode. You can do this by selecting View > New themes > LDD Extended. Place the part you added a new decal to, select the Decoration tool (found by first selecting the Paint tool), and click on your model. If all goes well, the first decoration in the list should be your newly modded one! But what happens if you want to distribute this file? Well, the decoration ID of each part is saved to the file. If you save your model with a custom decal on it, then load it into an unmodded (or modded without the current decal in it) version of LDD, it simply won't appear. The part is still registered as containing that decal though, as mentioned previously, and therefore if you open the file in a correctly modded version of LDD it will reappear again. This means that you can distribute your .LXF files either with standard decals, for users with unmodded version of LDD, or containing the modded files so that other people can use them too. Or both, which is probably better. One final note: le717 pointed out that updating LDD will cause any current mods to be lost, so you will need to backup your decals somewhere else and reinsert them into LDD each time there is an update, starting from Step 1 of this tutorial. Rendering Models with Custom Decals You've just finished building an AWESOME model using custom decals, and want to render it in POV-Ray*. But the POV-Ray converter requires that you use an unmodded version of LDD, so what do you do? It's very simple. After saving your model, change all the decals in it to any standard decals that LDD uses by default. Save a new copy of the file, and then rename your originaldb.lif file back to db.lif. When you load the LDD-to-POV-Ray converter, there is an option to render with custom decals. Just tick this, and replace all the decals with your own ones. Remember, if you want two of the same part (a minifigure's head, for example) to use different decals in the same model, you will need to give them both different standard head decals. The LDD-to-POV-Ray converter changes each individual decal for all parts that use it in a model. *Not sure how? Check out le717's tutorial here.1 point -

My Animations
aidenpons reacted to LimeKiller for a topic
I might have mentioned this before, and it's under my interests section of my profile page, but I like to make animations in my free time. In the last year, however, I slipped away from that as I got distracted by less productive things. (Team Fortress 2) This year, however, I made a resolution to put out at least one video a month. So yeah, I guess I'll keep posting. January - Still Alive Animation February - "Shovel the Walk" March - "Don't Drink and Drive" April/May - "Sharkbait" June - "Febreze Commercial Parody"1 point -

EVERYTHING IS AWESOME!
Ayliffe reacted to Drill Master for a blog entry
Everything is cool when you're part of a team! Yep! That's right! I finally saw The LEGO Movie! Now... There is only 1 thing I really hatted about TLM... That I didn't see it sooner! Okay so, being totally honest, this movie made me feel... enlightened? Inspired? Happy? AWESOME?! Really, I had a smile on my face the entire time I watched it. It's the kind of movie that I needed. Possibly the inspiration I needed for what I do in life. It's also made me see LEGO in a whole new way. I've had a large crate of bricks in my closet that I haven't touched in a few years to be honest. I think it's about time to open that crate, dust them off, and just start building. So yeah, I finally saw The LEGO Movie, and I'll probably watch it again tomorrow! Also expect to see more builds from me in the future.1 point -
My Animations
McJobless reacted to LimeKiller for a topic
Yes, that makes complete sense. I knew about most of that, for some reason it just didn't register correctly in my head. Pretty much, yeah. The program I use has this built-in, which I use to calculate the movement of different objects. However, some of it is automated so it's a lot more simplified than the examples you gave. I've used other programs as well, which were much more similar to frame-by-frame, traditional animation. When working with these applications, sometimes I created a keychart to help me, sometimes I just kind of made it up as I went. It was all just for practice.1 point -
The Great Kanohi Project
Quisoves Potoo reacted to Prototyke for a topic
Quite right. Hopefully this will remedy any color issues. My apologizes about the less than preferable non-transparent background. I am using a plugin for PDN that doesn't support transparencies. Thanks. Always nice to have fans.1 point -

Idea for RRU parody or skits... ...thing...
Ben24x7 reacted to McJobless for a topic
See, I'm going to be honest here. You sometimes have great ideas, but your execution (at least how you describe them to us) sucks. See, I'm very interested in a community parody, but before I get into that, a few things about the OP: Don't say "IF". That makes people less likely to go through with something. You have to try build confidence in people here for them to do anything. Most of us are quite busy and like to focus on things we're interested in. A quick trip to the Skype group would reveal that frequently multiple users will post about completely separate topics at the same time, because they don't care about any of the other topics. What you should say is, "Hey guys, I have an idea which we definitely should do. A Community Parody of a Film! I'm personally inclined towards LotR, but what about you guys? Let's make this happen people!" Except, better. Don't make people feel as though you're forcing them into something with language such as that. That tends to piss them off. There's no need for this chunk of text. You're only diminishing your chances of getting more people onboard with it. Confidence is one of the most important ingredients in getting any project launched. You'll also note how many failed projects clutter the site. It doesn't matter. If this were to succeed, it'd automatically rise above those projects anyway. Granted, you are probably right in putting it in General Discussion since it's not a *proper* project just yet, but there's no need to explain it. If somebody asks, go for it, but otherwise just don't worry. Again, you're going to make people lose interest. We don't even know what this project would end up looking like. That's why this discussion should exist; to figure out how a project like this would end up. Alright, my thoughts on this project. A community parody would probably work like a related bunch of shorts; people submit stop motions, 3D animations, machinima etc, and then they're collectively edited together in the same way as an episode of Robot Chicken, except with a coherent plotline. The key would be finding what skills people are interested in using, and then giving them the chance to use those skills. I'm not sure if we should do a full-feature movie, or at least one that's not related to the big interest here (LEGO). What I would probably do, if I was in charge of this, would write out some short skits that have characters based on people from RRU, and then give them LEGO qualities. From there, people can choose their favourite chunks of script and turn that into pieces of the overall work. Would it look good? Who knows. Would it be fun? Potentially. All I know is, I may *potentially* join this if LMVG modding continues to go as smoothly (sortta) as it has been. I'm hoping that my work load this coming term is a lot less than last term, but we'll see. Anyways, it's up to the rest of the community. They happen to be a lot more intelligent me so they've probably got a million better ideas (if they're interested in some big community project that won't fall through like Candy Raiders) :D1 point -

Lego Racers 2 EXE Parameters
aidenpons reacted to Fluffy Cupcake for a topic
This is one of my unexpected results for /startpos The video will probably look much better if you watch it directly on Youtube so here is the link. \ Edit: No point of double posting, so edit. I think it is quite obvious what /foyer does, it brings you to the foyer (the places where you choose a race) of the world that you select, and in arcade mode the warp to go to sandybay doesn't work.1 point