
Leaderboard
Popular Content
Showing content with the highest reputation on 10/18/2014 in all areas
-

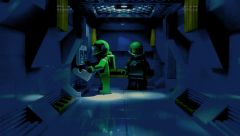
Salvage Team Alpha-09: Sector 8 Corridor (MOC)
Yajmo and 3 others reacted to Ayliffe for a topic
I ended up building this small section of corridor for my Lego RP account on twitter, Salvage team Alpha-09, and it turned out better than I expected photo-wise... More photos on my Flickr Photostream Enjoy!4 points -

RRU Quotes 2: Reckoning
Brigs and 3 others reacted to The Ace Railgun for a topic
[10/17/14 7:39:28 PM] DM sent a file to this group: Organ Test.mp3 [10/17/14 7:39:42 PM] DM: May I have some feedback on this? [10/17/14 7:40:06 PM] McJob: What is it, like a heart or a gut? [10/17/14 7:40:06 PM] The Machine: Connecting... [10/17/14 7:40:17 PM] DM: The brain actually [10/17/14 7:40:20 PM] The Machine: I'll put it in Ben.4 points -

Bad Translations
Quisoves Potoo and one other reacted to Ben24x7 for a topic
Input; I'm sorry I wasn't on earlier because; For TalkTalk users (like me) the internet went down this morning. It just came back up. ---------------------------------------- Output (Maximum of 43 Translations); Unfortunately, he left, and I, for example, Prince al-the user Walid I in the network in the morning,and I got it back. (Well, at least the end is correct)2 points -

Bad Translations
Quisoves Potoo and one other reacted to Shadowblaze for a topic
The Bad Translator has been updated, there's not Bing anymore. As a replacement, they put something called "Yandex", which can reach up to 43 translations. Pretty nice if you ask me. Original text: ""Well, enjoy the hate. lol"" ...43 translations later, Yandex gives us: "I don't know what to do come on baby" Okay, then. Original text: ""How dare you BT!"" ...43 translations later, Yandex gives us: "How to block accounts tħallas!" OKAY, then. I love this translator already.2 points -
Ayliffe's picture thing
ProfessorBrickkeeper and one other reacted to Shadowblaze for a gallery image
From the album: Pure Randomness
All credit goes to Ayliffe.2 points -

Visual Objects List (+Unused)
Quisoves Potoo reacted to Fluffy Cupcake for a topic
The visual guide to LR2 Objects: Note: Because there is an image limit, I can only do as much as give you an image strip of all objects, and then link you to the albums for individual images. Adventurers: Buildings: Album: http://imgur.com/a/nHesf Objects: Album: http://imgur.com/a/lthnX Skyboxes: Album: http://imgur.com/a/3H9el Download for those interested in viewing offline. Arctic: Buildings: Album: http://imgur.com/a/5QwpI#0 Foyer: Album: http://imgur.com/a/m3xRY#0 Objects: Album: http://imgur.com/a/WwoVl#0 Unused: all of these are located in the objects folder. Album http://imgur.com/a/DrFE4#0 The rest of worlds will come when I get the time, this does after all take a long time.Download for those interested in viewing offline. Some of you may be wondering what the point of downloading them is. Well let me tell you, because I organized my downloads to be the same hickory as the game, you can easily download it and extract the files to your game data folder. This allows you to easily see what the models are directly from the comfort of your window browser. Sandy Bay Unused: Objects BUSH_0# Bushes 1&2 are used on Dino Island Foyer, but are not found on SB despite being located in that directory. Buildings List of Car Builder parts that no longer exist:1 point -
Classic LEGO Games Ported to Garry's Mod/SFM
Quisoves Potoo reacted to Fluffy Cupcake for a topic
Already knew about the LI2 guy. And... hey! He gave me the source in 10 minutes! @Peabody Sam; Thanks. Knew about them ages ago, and I've already looked in partially in-depth about porting maps, so I know quite a bit already what can and can't be done. @LUModder; Okay, I'll check it out! Yeah... I know I said I'll hold on to it for a bit until I get more, but heck, I'll just post it now, making it available to everyone. https://www.dropbox.com/s/rner7vl69q6iyfs/Torq%20Racer%20(Gmod).zip?dl=0 Also, I fixed the low texture quality. Okay guys admit it, you never could get enough of throwing pizzas at people. Someone needs to take this model and make a throwing pizza weapon out of it. Edit: Well, it's a start, but at the current stage it won't go far. As you can see textures like the arrow and stripes have no mapping done, and this took quite a while just to get all the textures right alone. I used Karsie's HP model for this. I tried to export this trying both .obj and .3ds for usage in 3ds Max because I'm more familiar with it... but for some reason Max just hates exporting these files as SMD and crashes every time.1 point -

Salvage Team Alpha-09: Sector 8 Corridor (MOC)
Ayliffe reacted to Jimbob for a topic
The first words to spring to mind were 'Awesome' and 'Beautiful'! I'm not sure what I like most - the simplicity of the model, the sheen it possesses, or the wonderful lighting from the top - but I love this. I actually think it's a really nice effect. The slight grain gives it a movie feel, it's great.1 point -
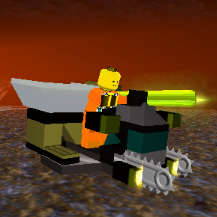
Salvage Team Alpha-09: Sector 8 Corridor (MOC)
Ayliffe reacted to aidenpons for a topic
Get a better camera. One with Super-Macro on it. May I congratulate you because I don't see a single bare stud - in one of your images on the photostream with no minifigures in it... GRRR It's quite nice. Very nice. It's just that the walls look a little bland... but I suppose you don't find too much stuff in corridors.1 point -
Bad Translations
Shadowblaze reacted to aidenpons for a topic
I've had this document floating around for a while. It was another one of my "type in this and see what results several times over." Now the next load of random text: "OH MAI YES YOUR SCORE CUBE" got: I Chiang Mai points So blog. Wow. Such text. Very post So, dice Yes, the legs Not to mention the dozens of Ohio KEPCO inflammation of the uterus (Haitian Creole was DEFINITELY in there. ) Beggars Or, perhaps, Bruce blog Lottery and points in Cuba ... I never saw a cube there. Not even once. EDIT: Chiang Mai is a town in Thailand.1 point -

LRR Pictionary
Ben24x7 reacted to someswedish for a topic
Here is yet another batch! Minecraft and Microsoft If it took less than 100 for LEGO Idea to make a set... Internet Reviewers parody And now for something completely different... Clone Brand Rock Raiders Worst time for that annoying dragon "slayer" to pop up1 point -
Salvage Team Alpha-09: Sector 8 Corridor (MOC)
Ayliffe reacted to Ben24x7 for a topic
For a second I thought this was CGI. Of course now I see it, it doesn't look as CGI as I first thought it to be.1 point -
My thoughts on Homepride Fred
Ben24x7 reacted to Shadowblaze for a blog entry
He has realized people will not love him forever, so he's preparing his plan for world domination. It's a matter of days before we will perish.1 point -
Matt's General Gameplay Tips + Techniques
coffins reacted to Matt for a topic
Matt's General Gameplay Tips + Techniques Foreword These tips are designed to make your Rock Raidering as efficient and effective as possible. However, these are just my experiences on what works best. If you personally think that what you do is better, by all means think that, and if you wish, you can post your tips. I may also have left some things out, so please do post if you have anything else to add to this guide. This guide should also be helpful when approaching levels not done before. While I guess most people have done all the levels on the original game, we are starting to see new levels coming from the overhaul mods, and so most of these techniques I used whilst playing through Baz's Mod. (In fact, some tips may relate more to his mod than the original game, as that's what I've been playing most recently.) Gameplay Interface Tips Changing the Game Speed This is one of the most useful things. I personally didn't know about it for ages, only stumbling upon it relatively recently. To change the game speed, just click on the question mark, next to the 'action stations' Then you can click on the + and - buttons to speed up/slow down the speed the game plays at. You should probably also turn automatic game speed off as well. If it's left on, it means that every time something happens, such as a monster emerging, or just a rock raider getting injured I think, then the game speed will return back to the default speed. I find this annoying, so personally I always turn it off. To do this: Press Esc, to bring up the 'paused' menu. Then click on 'Advanced Options', to go into the advanced menu. You can then click to turn automatic game speed off. Being able to change the game speed when you want makes your raidering a lot more efficient. I usually speed the game up more than the default 4 bars, (usually to 6-8), and increase to the max when I'm waiting for my raiders to do something and I don't have other instructions to give at that time (e.g collect resources far away, or even just whilst building a building). If I'm exploring a new cavern, or trying to pay attention to something, then usually I slow the game speed down a bit. Once you get used to changing the speed to suit your actions, you should find it a very valuable asset. Using the Individual Raider Display By pressing space bar, you will bring up the health bar, current action and hunger for each of your raiders. This is fairly useful: Using the health bar: If you see that the health bar is too low, you should teleport up the Rock Raider. This is useful if you have 'skilled raiders' that have been trained and can carry several tools. If you teleport him up before he loses all his health, then he won't 'die', and you can just teleport him back down again. He will have full health back again, and then you won't run this risk of him 'dying', which if he does, you won't be able to teleport him back again. Using the hunger meter: If all of the four quarters of sandwich around the raider disappear, he is hungry, and will then run off to the support station to feed. By seeing how much hunger each raider has, if he is about 1 quarter left, you can choose to manually feed him by clicking on the sandwich at the top of the menu when you click on a raider. This will save time in him running back. Also, if you do see raiders running back hungry, or even if they're halfway through eating at the support station, you should manually feed them. By manually feeding them, they are full in just one sandwich, whereas when they eat at the support station, it will usually take them five to become full. Using the current action: Not that much added use by seeing it, but I guess it's always nice to see what your raider's intentions are. (Although usually it's just an arrow until they get to the square that the action they want to do is on.) Using the Radar The radar is a very useful tool. I find it's easier to navigate around the cavern by clicking on the radar, instead of using the mouse at the edge of the screen. To navigate using the radar, you need to click and drag on the radar to move your screen to that point. You can just navigate through the cavern radar by clicking on parts of it, and the screen won't move to that spot. This is useful when you're trying to find things like monsters (all creatures appear as red dots on the radar). Also, the radar becomes a lot more useful once you have geologists. This allows you to see rock further behind the face rock. This is useful if you're trying to find hidden caverns, or just to see if drillable rock extends out that way. It can take awhile to get used to if you don't usually use the radar, but once you get in the habit of using it, it should become a useful asset. To bring out the radar, just click on the icon of the two bracket things, on the left side of the screen. It's best if you zoom out as much as possible, as this enables you to navigate the quickest. Priorities These are very useful to organise. Each mission has them organised in a certain order, which I usually don't like that much, so if you organise it the way you want at the start of the mission, it should help. You can open the priorities menu by clicking on the '123' button next to the action stations and options menu at the top of the screen. Building, reinforcing and drilling should all be at the top of your list. Recharging crystals is good to have at the top if you will be doing some in the mission, but if you won't, don't bother about it. Clearing rubble should come before collecting ore/energy crystals. It's good if the raiders clear the rubble before collecting the materials, as it means there are extra materials lying around for your small transport trucks to collect. Which way round you prioritize ore/energy crystals is dependent on the situation. Generally at the start of a mission, I'm wanting ore for all my buildings, and so energy crystals aren't much use to me then. However, once you need some energy crystals for the buildings, and then the objective, I put it in front of ore. You may need more ore again when you're wanting to upgrade vehicles, but usually you have heaps by then. The 'use vehicle' and 'repair building' priorities don't really matter, because as I manually get my driver's into their vehicles (explained later), and I hardly ever need to repair a building. If one does need repairing, then the raiders seem to do it automatically, even if it's at the bottom of my priorities. What to do on the First Gameplay of a Mission Tree This is what I think you should do on the first mission you do of a level tree. (I say this as you may be starting an overhaul mod.) This is best done on a mission where you don't have to worry about a diminishing air supply. Teleport down the max amount of raiders (should be nine in a mission without an air rate.) Upgrade them all to the max level at the tool store. This may seem to take awhile, but if you put the game speed up to max, it shouldn't do. It's probably best to name them at this stage, just so you can tell he's an upgraded raider in future missions. They don't have to be clever names. I personally just call them names like Bob1-Bob9 Now build up a base. This could be difficult in a mission like Driller Night, so if that's what you're doing, I'd wait until a more decent mission when you can build all up a decent base. You need to build a Teleport pad, Support Station, Geological Centre, Upgrade Station, Tool Store UP2, and a Dock. The dock can be hard to do in a mission without water, so this can wait until you do a mission with water. Go train those raiders! You want to end up with nine raiders that have been trained at every station. Once these are done, you should take advantage of the buildings, and teleport down 10 more raiders to go through the same process. 19 maxed raiders should be enough to get you through the entire tree. Some people may not bother with this process, and just train when needed, but personally, I like to have everyone ready, so I'm not fluffing about with training a driver or whatever to drive the chrome crusher, and I can just do it instantaneously. Mission Gameplay Tips/Techniques/Strategy This is just a general strategy that I use when I'm doing a standard, 'build up your base and collect' mission. Especially so when I was working through the levels of Baz's mod. The amount of raiders you should use to start with (in an air mission) is debatable. I personally use 5/6, and have no problem getting a support station before the air runs out. I guess you'll find the optimum number for you. First just drill the walls closest to your base. Just focus on building the Teleport Pad, Power Station and Support Station. You don't need to spend time drilling more walls than you need to, as you can get the ore needed for those three buildings in just nine walls. (Not counting power paths though.) However, if there's a lack of energy crystals, then you may need to drill some more. I suggest getting a small digger if there's still lots of drillable walls around, but it's best to then spend your energy crystals on small transport trucks. Remember that vehicles can be teleported back up again for their same crystal value. In terms of what else to build, I build the upgrade station, super teleport, and then usually another support station. The extra support station allows for you to take advantage of those 19 maxed raiders that you have. The upgrade station is good for using up all the extra ore you accumulate, and the upgrades to the vehicles are useful. The super teleport, well, everyone wants a chrome crusher don't they? Planning out where to place your buildings before you build them is good practice. Placing them side by side facing each other is often what I do. You can see me doing this partially here (apart from the teleport pad ), in this screenie of the Tunnel Transporter glitch: As you move later into the mission, you should build power paths. Power paths only cost 2 ore each, and it gives you something to do with all that ore that you accumulate. If you build a huge power path from your base to an area of lots of resources, it can help those poor little raiders that haven't managed to get themselves a small transport truck by this stage. In terms of the vehicles that you will end up using, one or two chrome crushers can do most of the work, and then you just need several small transport trucks doing the collecting. The Loader Dozer is sort of useful, but I've found that a raider on his own can clear rubble almost as quickly, and can do other things as well. So personally, I don't use the Loader Dozer, but you still might like doing so. Defence Tips/Techniques Dealing with Monsters The best beam against Ice and Rock monsters is the laser beam, and the best beam again Lava monsters is the freezer beam. You should get in the habit of placing an electric fence around your base. Allow for base development, and place the fence in every two squares, so there is a little light crystal thing in the middle square. Having an electric fence is useful, as if a monster emerges close to your base, you could probably leave action stations off and leave the monster to walk towards your base and get fried. This means you don't have to disturb your raiders from what they're doing. However, this only works if there aren't any energy crystals around where the monster emerged. You can kill monsters with the laser beam on the chrome crusher. While it can be hard to aim, if you get the hang of how it works, this can be a useful method of getting rid of monsters without turning on actions stations. (However this works better in Baz's mod as I don't think the original Chrome Crusher laser is as powerful.) Dealing with Slugs An important thing to remember with slugs is that they only seem to come out once you collect more than 10 energy crystals. So one way of completing slug missions, is to get the required amount of crystals out of the rocks and close to your base, and then collect them all at once. The slugs will be too late to stop you. Another strategy is to turn your power off until they go away. In my experience this doesn't work as well, as when they go back to their holes, they will just come back once you turn the power on. This to me gets annoying, and so generally I don't use this method. Other people may find this more successful for them though. A third strategy that I utilized is more useful in slug missions where the crystal target is very high (mainly Baz's mod here.) I've noticed that slugs will only move towards your base from their holes if their hole is within a certain distance of your base. So if you move your base far away from any holes, the slugs will emerge once you're past 10 energy crystals, but they won't move towards your base. This does require you to find a suitable spot though, as Slimey slug holes do tend to be in most cavern rooms. A fourth strategy is to build the support station against a wall and build everything else around it so there is no path for the slugs. Then turn off everything but the support station. (Make one of the buildings surrounding it the tool store so the raiders can go through, but not the slugs.) - Thanks to INB681 and Lord Zakida. A variation of the above strategy is to build buildings like Teleport Pads or Mining Lasers around the Slimey Slug Hole, so that they can't get out and move towards your base. Make sure the power is turned off in them. - Thanks to Grank. You can use the Laser and Pusher beams to do damage/move the slugs around. (By turning on Action Stations.) You shouldn't need to use this if you're using one of the above strategies, but this could be useful if you're not using one of the above strategies and you are becoming overrun. - Thanks to Grank. General Tips for Raidering Miscellaneous tips that can improve the efficiency of your Raidering: What tools to carry For each raider, I recommend you carry a drill (default), shovel and hammer as well as a laser/freezer beam if doing a monster mission, and a sonic blaster if doing a slug mission. The hammer isn't a necessity, but it allows you to reinforce walls easier (instead of waiting for someone to go back to the tool store and get one.) Reinforcing walls is useful for the obvious stopping landslides, but it can also be used to stop monsters emerging. If that wall keeps spawning monsters, it is useful to reinforce it, so they don't keep disturbing you. You don't really need a sonic blaster if you're employing one of the strategies mentioned above. However, it can be useful if a slug gets to your base and starts draining (and you don't want to turn the power off.) When getting a raider to enter a vehicle I've found it's easier to click on a raider that's close to the vehicle, and manually tell him to enter the vehicle. This seems to be more responsive than if you just click on the vehicle and click 'get driver'. If I do this, it usually takes ages for the driver to enter the vehicle you want, as the game seems to choose the furthest away raider to get in. If you're using the maxed raiders technique, then whatever Raider is nearby should be a driver, and you can start using the vehicle straight away. Generating Free Ore If you have an ore refinery upgraded to the max, and enough ore to build another building, you can essentially generate free ore. Take a support station, which usually takes 15 pieces of ore to create, and build it using studs (takes 3) - essentially building it for 6 ore instead of 15. But if you teleport the building out once it's been built, it gives it back as 15 pieces of ore (rather than the six you actually spent on it), and your team turns it into even more studs. - Thanks to Itchytasty and Grank. When Electric Fence Lights are in the Way If you have an electric fence one square away from a building and you try to make another building in-between, it won't come down as the little yellow decoy light prevents that from happening. However, you can teleport up the fence, build the building, and then bring the fence back down. - Thanks to LMS Engineer Deter Raiders from Crossing Lava Something that I found helpful on levels with lava pools placed so that the Rock Raiders tend to take a shortcut across lava: build a Teleport Pad (or really any building, but teleport pads are of course the cheapest and fastest to build) next to the corner. It tends to stop *most* shortcuts through that particular corner, but has the disadvantage of making the rare few idiot Rock Raiders that still decide to take a shortcut take more damage because they have to stay in the lava a little longer to get around the Teleport Pad. - Thanks to Glaedr Guide History: March 2012: Guide reposted as part of forum changes 2011: Images reposted Early 2010: Second edit, tips added from other members of the community Late 2009: Guide first posted1 point -
Rock Raiders 2: The Block Raiders Logo
coffins reacted to Fluffy Cupcake for a gallery image
 1 point
 -
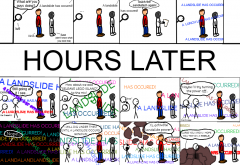
ALANDSLIDEHASOCCURRED
coffins reacted to Fluffy Cupcake for a gallery image
 1 point